My partner’s family and friends are all very much into making homemade wine. This was quite a new thing for me to experience since transitioning into a homesteading lifestyle. After a few years of enjoying many different flavors of homemade wine, including wild blueberry, raspberry-rhubarb, pincherry and pear, I decided that it was time for me to get into making it myself! I mean, I’m already making my own bread, cooking everything from scratch, canning and preserving, gardening, raising chickens and butchering hunted deer, so why not make my own wine too?
With a bottle of wine going for at least $10 and lasting only a couple of glasses (or maybe even one big glass), it’s kind of a no-brainer that homesteaders like you and me might as well start brewing our own. It’s a learning curve for sure, but it’s fun to do research, talk to friends and family who are seasoned winemakers, and just learn as you go! I’ll warn you, though – once you start, you’ll be going down a rabbit hole of endless possibilities and if you’re like me, you’ll constantly find yourself thinking, “hmm… could I make wine out of this?”
I always make full, five-gallon batches of wine at a time. I personally don’t do the small batch thing. If you ask me, it’s not worth spending all the time and effort and waiting sometimes months at a time for just four or five bottles. With that said, sometimes ingredients are hard to come by, expensive, or take a long time to collect – dandelion petals are certainly an example of this! I also understand that a lot of people might prefer to do a small batch if they just want to do a small taste for fun or are unsure if they’ll like the result, so I always make sure to calculate the ingredients for a one-gallon batch for those folks as well.
If you’re just getting started into the world of winemaking, I highly recommend this book from C.J.J. Berry called First Steps in Winemaking – it’s like a winemaking bible! You won’t believe how many different wine recipes are in there. It doesn’t go into detail about the individual steps and processes, though, so that will take some time and research to get the hang of everything. I also recommend starting with a couple of boxed wine kits to get an understanding of the overall processes before venturing into making your own country wines. I promise everything will start making sense eventually!
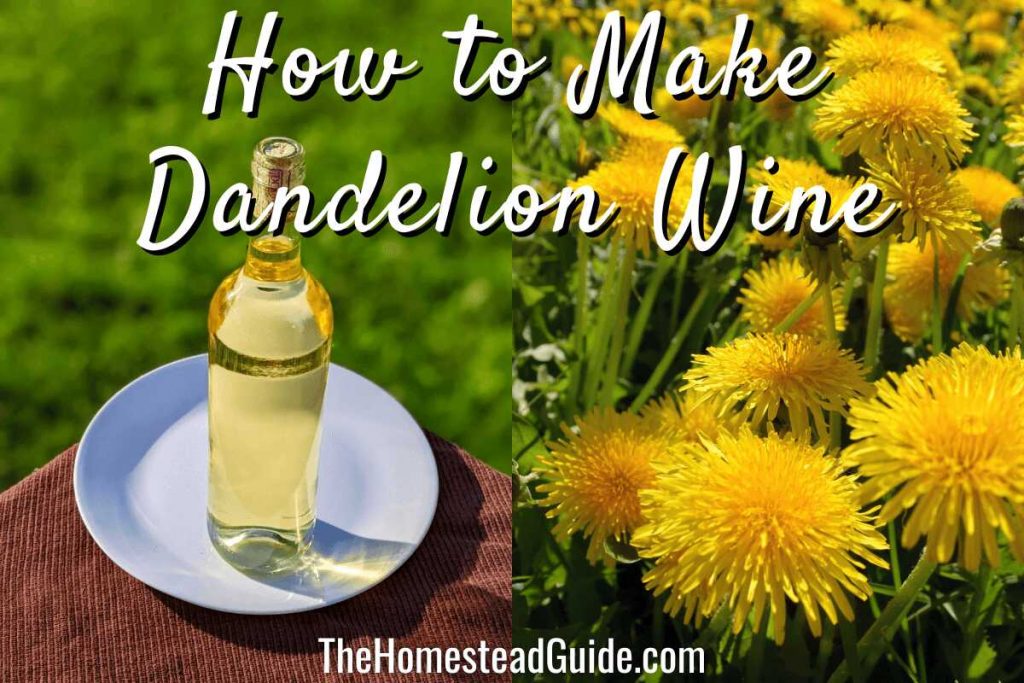
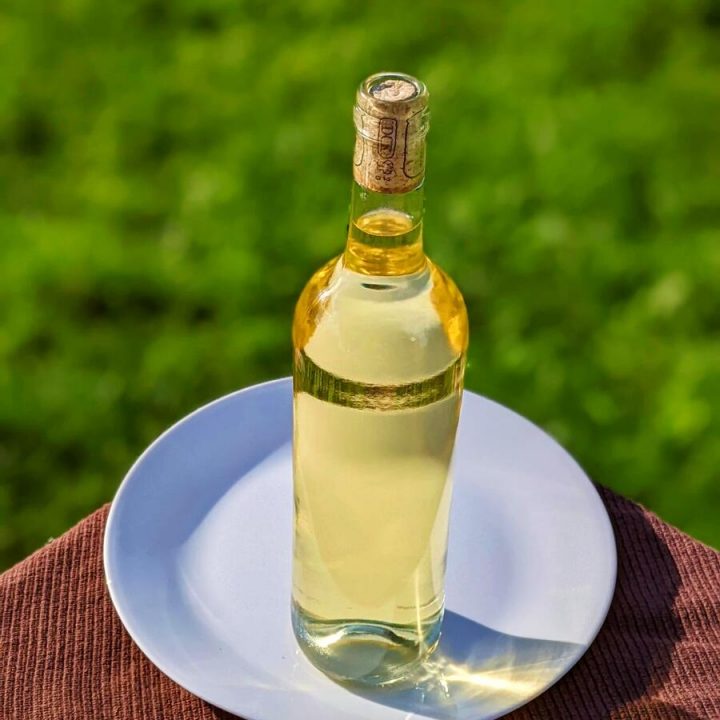
In this post, I go over how to make dandelion wine in five-gallon and one-gallon batches. It is the color of warm sunshine, crystal clear and just the right amount of sweetness to make the flavors come alive. If you’re willing to put in the work up front, you’ll absolutely love this very special wine!
- What is dandelion wine?
- What does dandelion wine smell like?
- What does dandelion wine taste like?
- Is dandelion wine sweet?
- How many dandelions do I need to make wine?
- How to Harvest Dandelion Flowers Quickly and Easily
- What equipment do I need for making dandelion wine?
- Plastic fermenting bucket with lid and airlock (primary fermenter)
- Glass carboy or demijohn
- Bottle brush and carboy cleaning brush
- Long stirring spoon
- Siphon tube and tube clamp
- Bottling wand
- Hydrometer
- Potassium metabisulfite
- Wine bottles
- Corks
- Corking machine
- Optional: Bottle rinser and sanitizer
- Optional: Bottle tree
- Optional: Wine filter
- What ingredients do I need to make dandelion wine?
- How to Make Dandelion Wine – Step by Step
What is dandelion wine?
Dandelion wine is a country wine (aka non-grape wine) flavored by dandelion petals and citrus fruits. It is light-bodied and has a very unique aroma and flavor. The beautiful golden color comes from steeping the dandelion petals in hot water to create a sort of tea as the base of the wine. It is like sunshine in a bottle – enjoying a glass or few is a perfect way to fill your heart and soul with the essence of spring or lift your spirits from the winter doldrums.
What does dandelion wine smell like?
Dandelion wine has a unique aroma – while most wines are made from fruit, dandelion wine is a floral wine, so you get this deliciously sweet, floral aroma with notes of citrus. It’s absolutely beautiful and is sure to impress anyone who tries it!
What does dandelion wine taste like?
Dandelion wine is a light-bodied wine with a delicate flavor. When you first taste it, the citrus comes out right away, followed by a distinct, almost honey-like note from the dandelion petals. Although it resembles white wine in its color, its flavor is quite different. It’s such a beautiful combination – you have to try it!
Is dandelion wine sweet?
This dandelion wine should be back-sweetened just a little bit to allow the flavors to come alive. It is somewhere between a dry wine and a sweet wine. Although I like my regular grape wines on the dry side, I prefer to slightly sweeten my homemade wines just enough to bring out the flavors of the fruits or flowers. Just like adding salt to a savory dish, adding just a little sweetness after fermentation enhances the flavor of the ingredients rather than introducing a sugary flavor or overpowering it with sweetness. Of course, the amount of sweetening is a personal preference, but this is how I like to do it!
How many dandelions do I need to make wine?
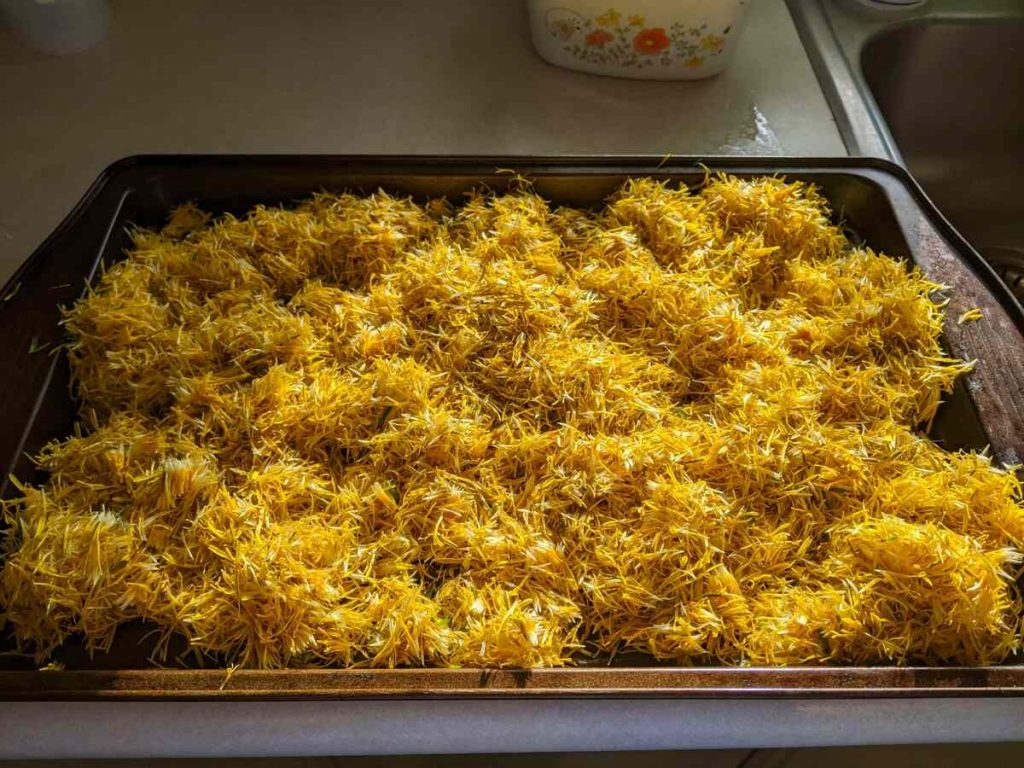
And this is why dandelion wine isn’t as common as other country wines. It is very labor intensive! For a one-gallon batch, you’ll need three quarts of dandelion petals – not three quarts of flower heads. You’ll need to actually pick all the yellow petals out of the base of the flower and try to keep out any green bits, as this can introduce bitterness to your wine.
For a five-gallon batch like I did, this means we had to pick a whopping 15 quarts – 60 cups – of dandelion flowers! It took my partner and a few weeks of putting in a couple hours at a time of picking a small batch of flowers, picking the petals out before they close up, and picking more. And of course you can only pick flowers when it’s nice outside and the flowers have opened up. I measured and froze the flowers over the course of our harvesting.
I have to be honest about how much work it is to harvest the flowers. It has to be done this way, too – don’t follow any recipes that say otherwise or you risk putting all your hard work to waste.
The end result is such a unique and lovely wine, and because it is so labor intensive, a lot of folks may not be able to make it themselves but have always wanted to try, so this wine makes a very special gift and a wonderful “valuable” wine to bring out during the holidays!
It is definitely one of those wines that I won’t be making every year but perhaps every few years – I’ll be saving my bottles for special occasions and gifts only. Besides, this wine is actually meant to be aged for six months to a year anyway (although I’ve opened a bottle after a month to try with my parents when they were visiting) so I would recommend making some other wines in the meantime that you can enjoy regularly!
How to Harvest Dandelion Flowers Quickly and Easily
Want to know a trick for how to remove dandelion petals quickly? The easiest way to pick dandelion petals is to grab the base of the flower head between your thumb and index finger and roll your thumb up, twisting the petals and separating them from the flower head in one motion. This video is a great example of how to do it:
You might develop your own technique based on this one. I like to grab the yellow flowers with my left hand (I am right-handed), trying to grab as little of the green as possible, and do the rolling/twisting motion with my right hand.
Once you get used to the technique, you’ll start working quickly and efficiently like a machine, and your fingers will be sticky and yellow every day, but it surprisingly washes right off and you’ll feel very accomplished afterwards!
Of course, you’ll want to ensure that you pick your dandelions from somewhere that is not treated with any pesticides or weed killer and is away from any dogs that could have peed on the grass.
What equipment do I need for making dandelion wine?
As you get into making wine as a hobby, you’ll find yourself slowly starting to accumulate more and more winemaking equipment. You don’t necessarily have to go out and buy the best of the best equipment right away, but I would still recommend getting good quality essential equipment and tools like what I have listed below. That way, the quality of your wine won’t be limited by the equipment. Most home brew shops sell a first-time winemaking kit with many of this equipment bundled together, and you can often find a lot of this sold secondhand as well. It might be good to make a checklist with all this equipment and start checking it off as you acquire it.
Plastic fermenting bucket with lid and airlock (primary fermenter)
This is where the majority of the fermentation takes place. You can buy a fermenting bucket from any home brew shop or online and they are fairly inexpensive. Some people use food grade buckets or alternative containers, but I highly recommend getting a proper brewing bucket because they are fitted with a lid and a hole for an airlock. I make 5 gallon batches of wine at a time, and my primary fermenter has a standard 28L capacity (just over 7 gallons). You generally don’t want to fill your bucket to capacity, because there is a lot of fizzing and expanding from the CO2 released during fermentation.
Airlocks are very inexpensive and very important in the fermentation process where the sugar gets converted into alcohol. An airlock allows the CO2 gas to escape without letting oxygen in.
Glass carboy or demijohn
After the majority of the yeast is used up, you’ll rack (transfer) your wine off the dead yeast at the bottom of your bucket and into a glass carboy.
Carboys are just big glass jugs. This is where the secondary, slower fermentation takes place along with any fining or clearing, aging and bottling. You’ll be racking your wine again and maybe a few times more before bottling, depending on the type of wine, so I’d recommend getting two to start with; I started with one carboy and one bucket at first, and it was no problem to rack from the carboy to the bucket and bottle directly from the bucket right away (although it was a kit wine which is easy to deal with), but you can’t let wine sit in the bucket after it’s done fermenting because there is too much air space. It’s better to rack from one carboy to another to gradually get rid of sediment and make sure your wine comes out crystal clear before bottling.
I use the larger 6 gallon carboys for my full batches of wine. Once you start making wine, you’ll probably start accumulating more and more of these. I’d recommend buying them at a local brew shop or checking local marketplaces for winemaking equipment – oftentimes, you’ll find people selling a bunch of used equipment for cheap.
Bottle brush and carboy cleaning brush
A bottle brush and carboy cleaning brush are really handy for cleaning the inside of your narrow-necked containers. No further explanation needed!
Long stirring spoon
You’ll need a long plastic spoon to stir in your ingredients during primary fermentation. The back end of the spoon fits in the mouth of a carboy, so I just flip it around and use it for degassing and stirring in fining materials like bentonite once my wine is in the carboy.
Siphon tube and tube clamp
Again, you can buy a lot of this equipment at a home brew shop and usually together in a winemaking package. A siphon tube is essential to winemaking, and a tube clamp comes in handy when it comes to attaching your bottling wand. Siphoning is how you rack, or transfer, your wine from one vessel to another. You can siphon manually by creating the suction with your mouth or you can purchase an auto-siphon, which is basically a hand pump that starts the siphoning process for you.
Bottling wand
In my opinion, whether you make large or small batches of wine, a bottling wand is a must-have. It’s an attachment that goes at the end of your siphon tube and has a tip on the end where it allows wine to flow out when it’s pressed down, and it stops the flow when it’s lifted up. This way, you can start bottling from the top of your carboy and work your way down to ensure there is no sediment in your wine. My wine is always clear and sediment-free when it’s ready to bottle, but I still put the last few bottles aside for us to drink first just in case there were some tiny bits at the bottom that I could have missed.
Hydrometer
This is a very important piece of equipment. Hydrometers measure the specific gravity of your wine, which is a crucial step in determining the alcohol content of your wine. It is also used to determine how much sugar to add to your fruit must to get a desired alcohol percentage. Your hydrometer will come with a table that corresponds to that particular device, so hold on to that table! Make sure to get a graduated cylinder as well to float your hydrometer in. You can pick these up easily at a home brew store if you have one near you.
Potassium metabisulfite
This isn’t really equipment, but it is still a requirement for home winemaking. The most important aspect of winemaking is proper sanitation. Do not overlook this! I’ve noticed some misinformation online about this being optional or people being scared of the word “sulfites” – don’t worry at all! Firstly, you should always, always sanitize your equipment with a potassium metabisulfite (known in short as “k-meta” by winemakers) solution. Whether you want to add it to your wine or not is your decision, but I always do it, especially if you plan on aging your wine longer than a few months.
Potassium metabisulfite is an antioxidant that preserves color and flavor and prevents spoilage by removing suspended oxygen from your wine. If you’re aging your wine in a carboy, you definitely need to add some. Also, do not use sodium metabisulfite – use potassium. Sodium can affect the flavor of your wine too much where potassium does not, as long as you use the proper amounts.
As I mentioned, it’s used as both a sanitizing agent and a preserving agent. When using it for sanitizing, mix up a solution of 3 tbsp per gallon or 2 ¼ tsp per quart or liter.
Make sure to mix in a ventilated area and try not to inhale directly above your solution, as it creates sulfur dioxide gas that can irritate your throat and make you cough.
After you wash your equipment and anything that comes in contact with your wine, spray it down with the solution and don’t rinse.
It neutralizes mold, wild yeasts and bacteria on surfaces and in your must (fruit mixture). You don’t want the chance of any of that multiplying in your wine or you could ruin an entire batch. When adding directly to your wine or your must, a dosage of ¼ tsp powdered kmeta per gallon is enough.
If you haven’t experienced it yet, you’ll soon find that a large chunk of your time making wine is spent washing and sanitizing equipment!
Potassium metabisulfite comes in powdered form or in Campden tablets. I don’t recommend tablets. It’s much easier to measure out the powder and dissolve it, and you want to be sure it’s potassium and not sodium metabisulfite.
Wine bottles
You can buy cases of wine bottles from a brew shop or save your own. You might even get lucky and find someone selling a bunch of them for next to nothing! It’s recommended not to use threaded bottles because the glass is thinner and weaker. Some people still do it and have no problems, but it’s best to only save bottles from corked wine and not the kind with the screw caps.
Corks
I buy corks from my local brew shop and they are quite inexpensive for a big bag of them. They’ll most likely be pre-sanitized and will not require soaking. If you are unsure, ask the staff and they will be happy to let you know.
Corking machine
If you can get your hands on one of the standalone corking machines, definitely get one! Corking machines come as a standalone apparatus or, I believe, there are some that clamp on a counter. This is something you should definitely look to buy used if you can. It is very easy and very satisfying to use! Your local home brew shop will most likely rent these out if you don’t have one yourself.
Optional: Bottle rinser and sanitizer
When you make 5 gallon batches of wine, a bottle rinser and sanitizer is a godsend! You just fill it partway with sanitizer (potassium metabisulfite), insert the bottle onto the pump and give it a few presses to totally rinse the bottle out with sanitizer. It fits on top of a bottle tree, but I take off the base and put it right in the sink because it sometimes sprays out the sides a bit. It’s not necessary, but it sure is convenient!
Optional: Bottle tree
A bottle drying tree is super handy when it comes to washing and sanitizing a bunch of wine bottles at once. It keeps them inverted and drip drying, and I feel like this, along with the pump rinser, makes washing and sanitizing bottles much easier and quicker.
Optional: Wine filter
If you can successfully rack your wine off the sediment at the bottom and your wine is crystal clear without anything floating in it, you probably don’t need a filter. Filters are very expensive, with the Buon Vino being one of the most well-known brands. Check with your local brew shop, though – ours rents this exact filter for only $5/day and the filter pads are only $5 in-store, so if we need to filter our wine like we did with the dandelion wine, we’ll just get everything ready and rent the filter for the day. I will admit that it makes such a big difference and you don’t lose as much wine at the bottom!
What ingredients do I need to make dandelion wine?
Dandelion petals
So fluffy!
Dandelion wine is very labor intensive, but that is why it’s so precious! For a one-gallon batch of wine, you’ll need three quarts worth of dandelion petals. Yes, that’s right, petals. Don’t try and get around this by putting in whole flower heads or you’ll end up with a bitter wine and all your hard work and effort will go to waste. Have you ever tried dandelion greens or tasted the white sap in the stem? It’s bitter!
For a five-gallon batch, you’ll need a whopping 15 quarts – 60 cups – of dandelion petals. Definitely recruit some friends (or hire some little ones!) to help pick and pluck the dandelions. I find it best to work in smaller batches, as the flowers start to close up fairly quickly after being picked. My partner and I worked together and we put in a few hours a day as much as possible over a week or two and froze the petals in Ziploc bags as we harvested.
I went over my favorite technique for removing dandelion flower petals above if you want an insider tip!
Sultana raisins
Raisins are pretty commonly used to add body to country wines. Body is that “thicker”, velvety mouthfeel you get with grape wines. Picture the difference in the “thickness” of a glass of red wine vs. a glass of water. This wine is pretty thin in that regard. Some people use white grape concentrate that you can get at home brew shops or even store-bought white grape juice (but make sure it is sorbate free). Raisins will add some fermentable sugar to your wine that doesn’t get picked up by your hydrometer at the beginning, so you should account for that. Basically, if you calculated the amount of sugar needed to achieve a certain percent alcohol, add a couple pounds less sugar than it calls for to account for the raisins adding more sugar.
Lemons and oranges
Besides adding the necessary acidity (tartness) to your wine, citrus fruits add a significant amount – dare I say majority – of the flavor to this wine. Dandelion wine is basically a citrus wine made with dandelion tea instead of just water. The citrus pairs beautifully with the floral dandelion notes.
Sugar
You can’t get alcohol without yeast and sugar. Since the dandelions and, for the most part, the citrus fruits aren’t contributing any fermentable sugar, all of the alcohol production is coming from the added sugar and some from the raisins. Use plain white sugar to avoid any unexpected flavors added to your wine. Remember that adding a lot of sugar at the beginning won’t give you a sweeter wine – it will make it more alcoholic. If you want your wine to be sweeter, backsweeten your wine after fermentation is done and add potassium sorbate to stabilize it and prevent it from refermenting.
Good quality water
It is probably fine to use well water or city water, but I prefer to buy those big blue 5-gallon water jugs. Your wine is only as good as your water you use to make it!
Yeast and yeast nutrient
I use Lalvin K1-V1116 for my country wines. You can’t really go wrong with this one. I haven’t gone down the rabbit hole of researching different yeasts yet because I am happy with this one and this is the one that the local brew shop recommends. If you buy your yeast and wine equipment at a local home brew shop, they will be more than happy to set you up.
It is a good idea to add yeast nutrient as well so that you get a healthy fermentation going. Wine grapes are specifically grown to have all the right components to making wine, but when we make country wines without wine grapes, we might need to make up for some of these components that are not naturally there. It’s an easy enough addition and it ensures that your wine starts fermenting nicely and consistently right away.
Potassium metabisulfite
Potassium metabisulfite, or kmeta for short, is used for sanitizing as well as in your wine to prevent spoilage. It’s an antioxidant, so it removes free oxygen suspended in the wine and helps preserve color and flavor. A dose is ¼ tsp per 5 gallons. If I am making a fruit wine, I add ¼ tsp at the beginning to my fruit to kill off any wild yeast, bacteria or other microorganisms, and I will dose another one or two times during fermentation and racking, especially if the wine is going to be aged.
Potassium sorbate
As I mentioned before, you need a stabilizer if you are backsweetening your wine to prevent it from refermenting. You don’t want your bottles exploding over time! A good rule of thumb is to consider sorbate as the required second component of backsweetening in addition to the simple syrup.
How to Make Dandelion Wine – Step by Step
Okay, let’s get started. I’ll go over the steps in detail if you want to follow along, or you can skip right to the recipe (link) with condensed steps.
The detailed steps are based on the 5-gallon recipe, but you can change the recipe at the bottom to 1x (1 gallon) or 5x (5 gallons) and follow along the same.
Step 1: Prepare your dandelion petals and raisins
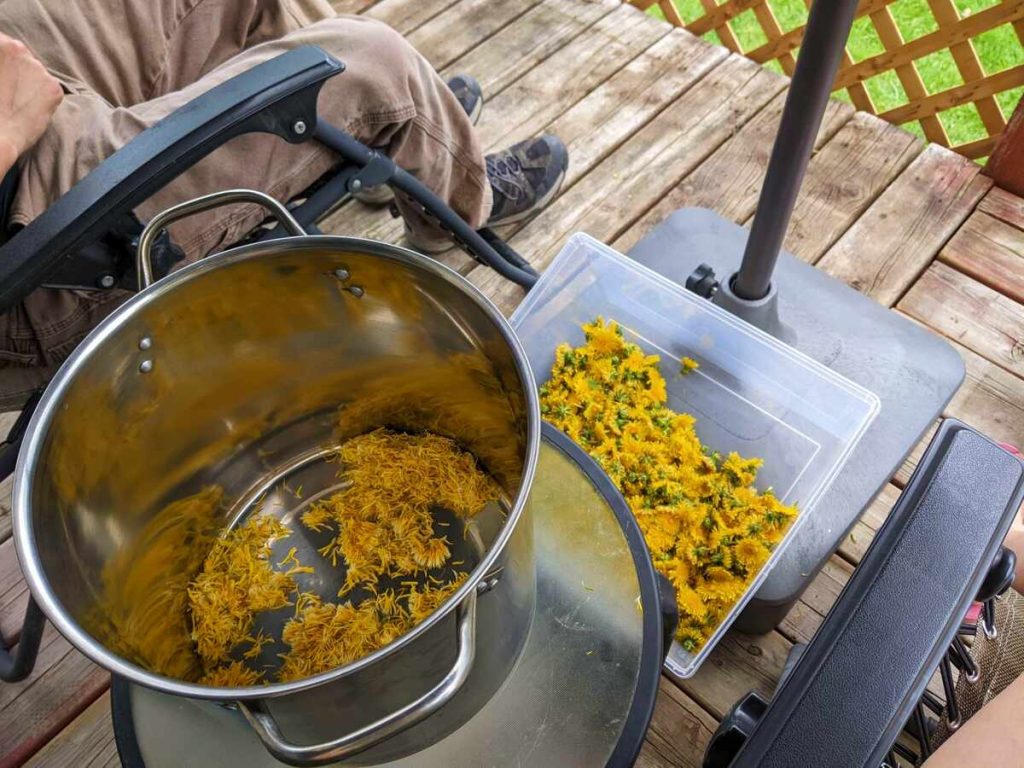
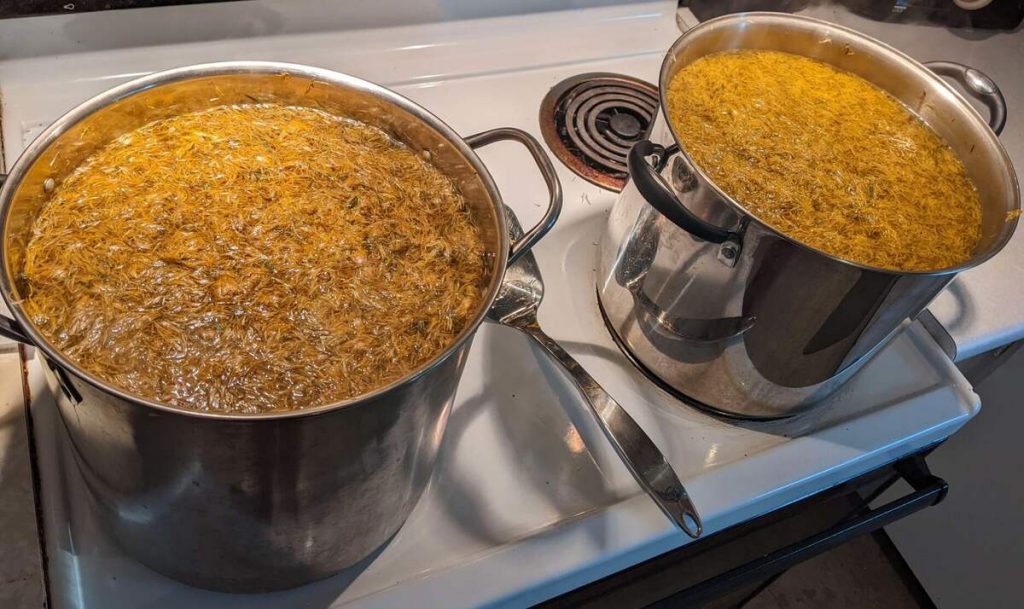
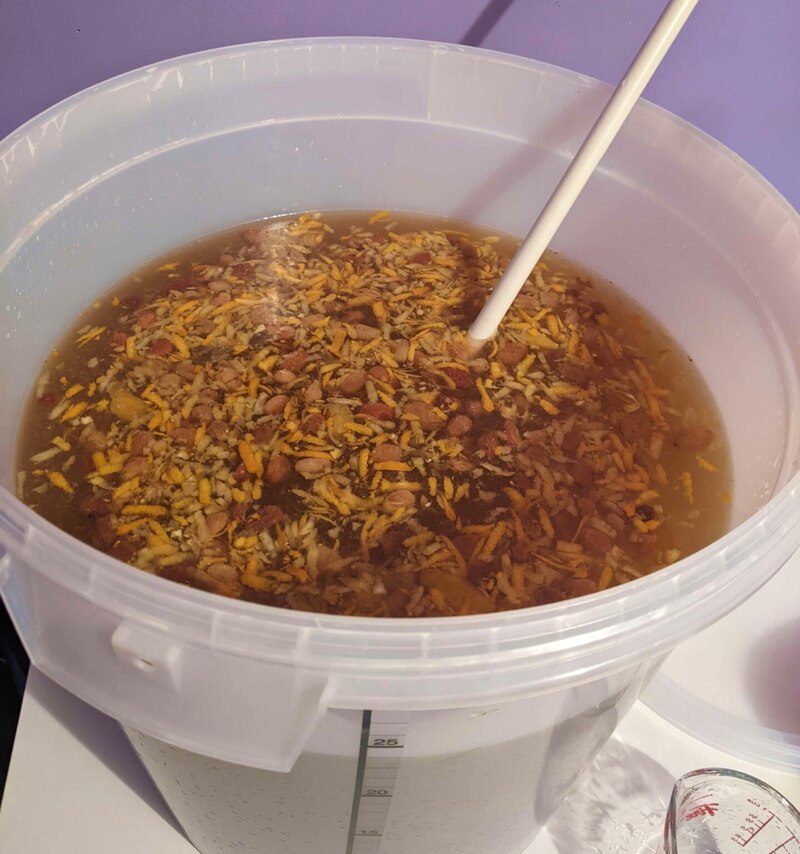
- Bring water to a boil and turn off heat – I filled two stainless steel stockpots. Keep track of how much water you are using, as you will be topping up to 5 gallons later. Stir in dandelion petals. Let this mixture sit for two days or so, covered with a lid. Stir a few times a day to keep it from forming any mold. This is where you get the dandelion flavor and aroma, but you don’t want to cook the petals too much and affect the flavor. Keep tasting until you get it as strong as possible without it tasting too plant-y. You are basically making a very large batch of dandelion tea.
- Cover your raisins with hot water, rinse a few times, and soak overnight or until your dandelion tea is steeped to your liking. The raisins will rehydrate and you’ll probably see some oil floating at the top. They are usually coated in some sunflower oil to prevent them clumping in the bag. Try to rinse off as much of the oil as you can.
Step 2: Add the rest of your ingredients and start fermenting
- Wash all equipment and spray down with a potassium metabisulfite solution.
- Pour dandelion tea through fine strainer or cheesecloth into your primary fermenter and discard the petals.
- Zest and juice oranges and lemons and add the zest and juice to the primary fermenter. Top up with water until you get to 5 gallons or just over. You will have probably lost a bit of liquid from the beginning.
- Add sugar. Stir very well until the sugar is completely dissolved.
- Roughly chop raisins before adding to primary fermenter – this helps release the sugars.
- Take initial specific gravity (SG) reading. Want to aim for about 11-14%. Ours is at 1.07, not including the sugar from the raisins, so keep in mind that will effectively raise your initial SG.
- Stir in yeast nutrient – about 1 tsp/gal.
- Sprinkle wine yeast directly on top and cover with lid fitted with an airlock. Do not stir yeast and do not try to activate it beforehand. It will have no trouble finding the sugar.
Insider tip: Did your dandelion petals stain your stainless steel pots yellow? Don’t worry – use baking soda and a non-abrasive pot scrubber and it will rinse right off!
Step 3: Primary fermentation
- After a few days, you’ll see a lot of activity. It is okay for it to smell sour at this stage – this is from the lemon juice. Once you see it actively bubbling out the airlock, you’ll need to “punch down the cap” of raisins and zest that floats to the top at least once or twice a day. You don’t need to stir completely from the bottom, but keep punching down the cap to keep it submerged and prevent mold from forming at the top.
- After a few more days to a few weeks, you’ll see the dead yeast start collecting on the bottom and your wine will start to smell like alcohol. Once fermentation slows, take SG readings until it reaches your desired final level to produce the proper amount of alcohol. This is probably around 1.000 or just under. I left mine a little too long and it reached 0.985, giving an alcohol percentage of about 14% for my circumstances, which was a bit higher than I aimed for. My starting SG was 1.07, which corresponds to 10.09% on my hydrometer chart, so my calculation was 10.09-(-3.9) = 13.99 ~ 14%. I would say somewhere between 11-12.5% would be ideal for this wine.
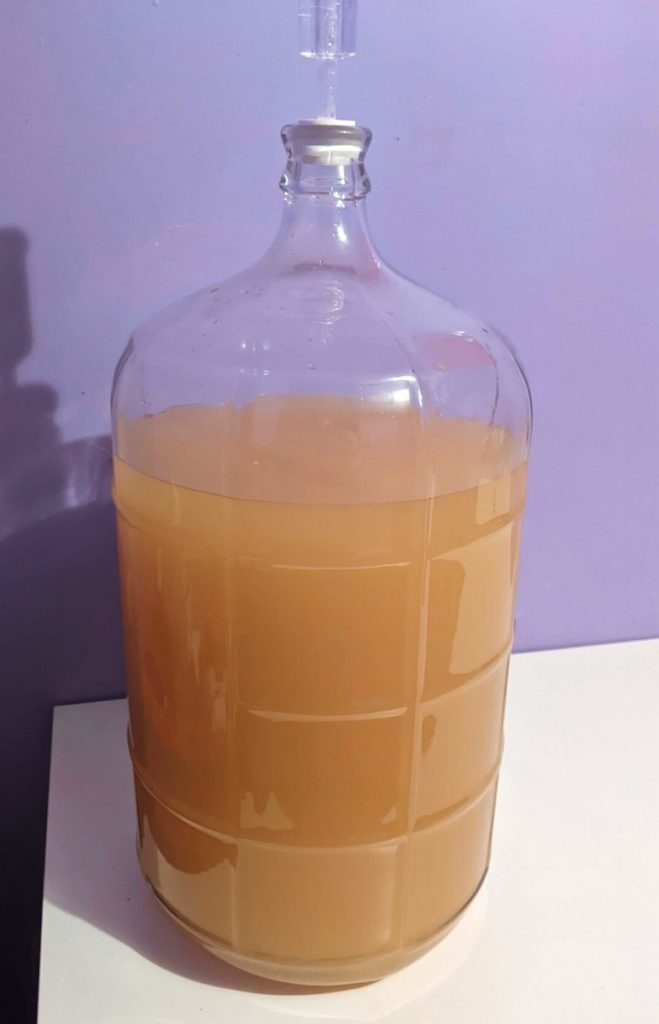
- Now, you’ll need to rack your wine off the dead yeast and fruit mixture. Sanitize your equipment and carefully strain out any floating raisins without disturbing the bottom, then siphon into a glass carboy or secondary container. This is a good time to also mix in a dose of potassium metabisulfite to prevent spoilage. Place airlock on top, as the kmeta will produce some gas as it removes suspended oxygen particles.
- At this time, your wine won’t taste like it will when it is ready to drink. You will probably pick up on the distinct floral and citrus notes already, though!
Step 4: Secondary fermentation and clearing
- Your wine will probably still be cloudy at this stage. Remember to never bottle cloudy wine. It can take weeks and sometimes months for certain wines to clear. Luckily, this one doesn’t take as long.
- Degas your wine by stirring vigorously for 10 mins or so with the handle of your long spoon. Taste it and ensure it’s not spritzy on the tongue whatsoever. You can also buy these neat “wine whip” degassers that fit on the end of a drill and are super convenient!
- You can add bentonite to help clear your wine faster. You’ll need to make a slurry and dissolve it first. Bentonite is a pain in the butt to mix because it clumps so quickly, so try your best to dissolve a bit at a time in hot water and whisk up until you get a gray sludgy mixture. It may look gross, but it will not affect your flavor at all. Mix it in very well then let it sit for at least a week. You’ll start to see your wine clear up from the top down! Use an airlock rather than a solid bung here in case the wine is still degassing.
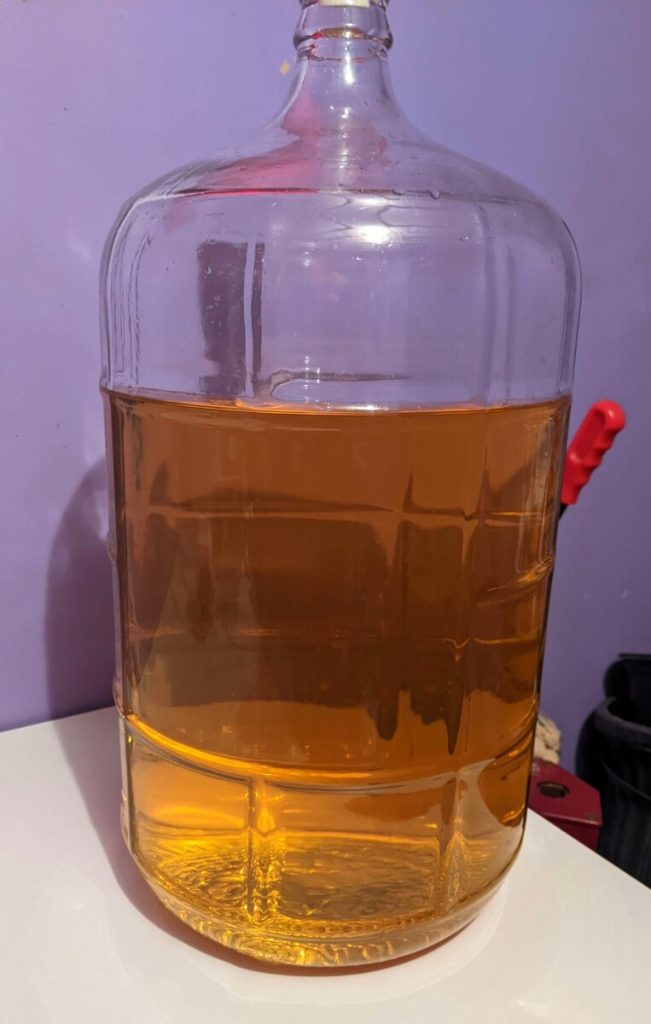
- Now, in the picture above, note that there is a large headspace here and normally you can top up with water or even white wine, but since this wine is so delicately flavored, I didn’t want to water it down at all. I also knew I was going to bottle it fairly quickly, so I wasn’t too worried about it spoiling. Potassium metabisulfite will help in this circumstance to avoid the wine oxidizing or otherwise spoiling from being in contact with too much oxygen if it was to be left to age in the carboy.
- If, after a week or two, your wine still has sediment floating in it or it isn’t completely clear, you may want to actually filter it. Check with your local home brew shop to see if they rent out filters. If not, you can absolutely keep waiting for it to clear on its own. This stage of winemaking takes the longest, so don’t worry if you don’t see anything right away. It is hard but be patient!
Step 5: Sweetening and bottling
- Only after your wine is completely clear is it time to rack it off the fallen sediment once more and get it ready for bottling. Some wines, like strawberry, need to be racked multiple times over months before it is clear enough to bottle. Rack your wine into another carboy. You have the option of adding another dose of kmeta at this time for preservation. If you choose to add more kmeta, put the airlock back on and give it a day to degas.
- Take a small sample of your wine and keep aside to compare. Make a simple syrup and add to taste. I only ended up using ½ C of simple syrup for 5 gallons, but it was enough to really bring out the flavors. This wine does do better on the sweeter side, so use as much as you prefer. Add a bit at a time and taste as you go so you don’t overdo it – the flavors will really come to life with a bit of sweetening! You must use potassium sorbate if you add sugar at this time to prevent the wine from refermenting. Stir in ½ tsp sorbate per gallon and leave for a day to make sure it takes effect. I’ve heard accounts of people who didn’t add stabilizer and their bottles started popping their corks and exploding in storage after a few months – yikes!
- Your wine is ready to bottle when it is crystal clear and stabilized. Wash and sanitize your wine bottles, then start the bottling process! This is best done with two people. It really is best to use a bottling want and siphon hose, even if you are making a small batch. This way, you can start from the top and work your way down, just in case there are a few tiny particles left that settled at the bottom. I’ll keep track of my last few bottles for this reason and keep them for me and my partner just in case. We want to save the best ones for gifts and drinking with friends and family.
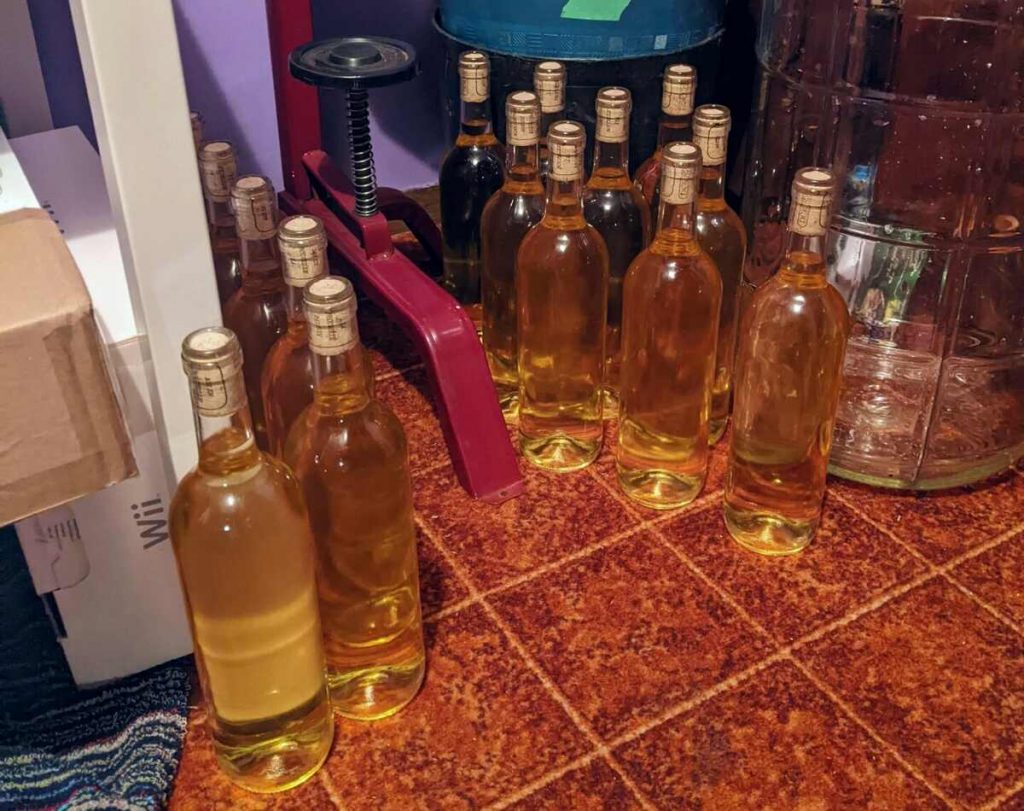
- Keep the bottles upright for a day to make sure the cork has fully expanded (do not soak your corks beforehand unless specifically instructed by the brew shop staff or wherever you get them from) and then store them on their sides.
They say this wine is at its best after it is aged for 6-12 months, so keep that in mind. But I had to try it early on and it was very enjoyable! It has a beautifully sweet and floral aroma with a mild taste and light body. You can tell right away it’s different from a grape wine.
I have no problem aging this wine because of how labor intensive it was to make! It’s one of those wines you put away and save for special occasions. I bet you everyone will want to try it!
Dandelion Wine - 5 Gallon and 1 Gallon Recipes
Follow this recipe to make a large or small batch of golden, sweet dandelion wine. It's sunshine in a bottle!
Ingredients
5 Gallon Recipe (Approx. 24 bottles)
- 60 cups dandelion flowers (just yellow flower petals)
- 5 lb sultana raisins, rinsed of oil and soaked
- 10 lemons
- 5 oranges
- 8-10 lb sugar (see notes)
- 5 gallons water
- Wine yeast (1 packet, Lalvin K1-V1116 or similar)
- 5 tsp yeast nutrient
- Potassium metabisulfite
- Potassium sorbate (stabilizer)
- Bentonite for clearing (optional - see notes)
1 Gallon Recipe (4-5 bottles)
- 12 cups dandelion flowers (just yellow flower petals)
- 1 lb sultana raisins, rinsed of oil and soaked
- 2 lemons
- 1 orange
- 1.5-2 lb sugar (see notes)
- 1 gallon water
- Wine yeast (1 packet, Lalvin K1-V1116 or similar)
- 1 tsp yeast nutrient
- Potassium metabisulfite
- Potassium sorbate (stabilizer)
- Bentonite for clearing (optional - see notes)
Instructions
Preliminary
- Make sure all of your equipment and tools are cleaned and sanitized. Continue to sanitize everything that comes into contact with your wine during the entire process with a potassium metabisulfite solution of 2 ¼ tsp per quart or liter of water.
Preparing Your Wine
- Fill large stockpot(s) with water and bring to a boil then turn off heat. Steep dandelion petals in water for 1-2 days, making sure to stir with clean utensil multiple times a day and keep covered with a lid. Rinse raisins in warm water and soak overnight or until dandelion tea is ready.
- Pour dandelion tea through fine mesh strainer or cheesecloth into primary fermenter. Discard petals.
- Stir in sugar until completely dissolved.
- Zest and juice lemons and oranges and add zest and juice to primary fermenter.
- Roughly chop raisins and add to primary fermenter.
- Top up with water to 1 gallon or 5 gallons. Can add slightly more, as you will lose some liquid along the way.
- Record initial specific gravity (SG) reading. Should be around 1.07-1.09, give or take.
- Stir in yeast nutrient – about 1 tsp/gallon.
- Sprinkle wine yeast over the top. Do not stir it in and do not try to activate it beforehand. The yeast will have no problem at all finding the sugars.
- Keep primary fermenter in a warm location out of direct light. Cover with lid and airlock.
Primary Fermentation
- Fermentation will begin within 24-48 hours. Punch down cap of raisins at least once a day and stir the top of the mixture to keep it from developing mold.
- Once fermentation slows, take SG readings until your wine reaches the desired final level, usually 1.000 or just under. You should be at or just under about 11-14% alcohol. Subtract the final SG reading from the initial to calculate the alcohol level.
- Carefully skim off any floating pieces and rack your wine off the dead yeast and fruits into a glass carboy or secondary container.
Secondary Fermentation and Clearing
- Degas your wine by stirring with the long spoon handle or drill attachment.
- Add dose of potassium metabisulfite – for 5 gallons, stir in ¼ tsp and for 1 gallon, stir in 1/16 tsp. Fit the carboy with the airlock and let it sit in a dark place to finish any remaining fermentation and start to clear. This may take a while.
- To speed up clearing, add a slurry of bentonite into your carboy and mix well. You’ll start to see the wine clear up from the top down. Leave for a week or two, and partway through, lift carboy and give a quick twist to dislodge any particles stuck to the walls of the carboy.
- Let it sit until wine is perfectly clear and there are no floating particles.
Sweetening and Bottling
- Rack wine off sediment and into another carboy. Dosing again with potassium metabisulfite is optional.
- Sweeten to personal preference with simple syrup – I only needed ½ C in my 5 gallon batch for my liking. Add a small amount at a time and taste as you go. It shouldn’t be overpoweringly sweet, but it should be enough to make the flavors come alive.
- Add ½ tsp sorbate per gallon to prevent refermentation. Mix in well and let it sit for a day to take effect.
- Using bottling wand and siphon tube, bottle your wine from the top down. Make sure there is no remaining sediment. If any gets in the last bottle, put it aside for yourself to drink first and keep the nice ones for gifts or special occasions.
- Keep bottles upright for a day to allow the cork to fully expand. Afterwards, store bottles on their sides in a cool, dark place.
- For optimal enjoyment, age for 6-12 months before opening
Notes
- Amount of sugar is calculated by the table that comes with your hydrometer. It is based on the specific gravity. Adding too much sugar at the beginning puts your wine at risk of becoming too high in alcohol. Raisins also add fermentable sugar that is not picked up by the hydrometer reading at the beginning. I calculated about 7.7 lbs of sugar to add to mine.
- You can add your bentonite slurry at the beginning during primary fermentation or after it’s been transferred to secondary. It helps it clear faster if you add it at the beginning but it is up to you.
- Take notes throughout the process! Whether you are experienced or just starting out, taking notes is essential. You will inevitably have to make some of your own adjustments, and you’ll want to look back and see what you did when it comes to
making more wines. It will also help you get a better understanding of what is happening and it will help a lot with troubleshooting if anything goes wrong.


Can you dry your dandelion? I use the same process for harvesting and prepping my flowers but haven’t frozen them.
Made dandelion wine last summer ( not your recipe ) but, kept it really really old school. I used granuated sugar and honey. I didnt have hydrometer so basicly just winged it. It took 6 months and seemed to have fermented for a long time. I didnt use yeast nutrient just champain yeast. When I seen fermentation was slowing down in the end I would shake the carboy into a circular motion 3-4 times a day ( I believe this helped the degassing process as I didnt use any tools to do so with.) I only racked twice over the 6 months it took before filtering and the lees didnt effect the end result ( that I know of as it was my first time making wine.) Everyone who tried it really enjoyed it and bottles didn’t stick around long enough to age as everyone wanted to try it. I never had any problems w/ bottles blowing up like I did w/ my blueberry wine. I did use a filtering machine ( vino ) before bottling. I didnt use any potassium metabisulfite or potassium sorbate. Like I said I kept it old school, how did they make it in the 1800’s w/ out that stuff … that was the project. Another note, I found the best way to keep dandelion was to dehydrate the pettles, So my must was made w/ dried out ( not burnt ) but lightly dried out pettles. I used lemon zezt and sliced lemons and raisons. I never knew of the oil from raisons however, I didnt use lots anyway ( a quarter of what I heard on a youtube vid.) I chose to do that because of comments read on other sites that claiming raisons ruin the flavours of what one is trying to make … meaning I didnt want my wine to taste like raisons. I didnt notice any raison or oil in taste in my wine. Thanks for making me aware I will change that this time around. This time I am going to try dandelion / almond and use cane sugar. Im going to make the amount of 1 gallon of almond and 4 gallons dandelion making a 5 gallon wine. Think the combination of flavours will be really good. Dandelion w/ a hint of nut is what I am going for. Will use orange zezt for almond and lemon for dandelion. There will be oil in raisons and almonds that I will take care of. Wish me luck !